Project 1: Image Quilting
Due: Tues, Sept 30 (11:59 PM)
This project involves implementing a simple texture synthesis method, Image Quilting. Additionally, graduate students should implement the second part, PatchMatch, which can be used for texture synthesis, but for simplicity we will just use it for finding correspondences between image pairs. The second part is optional for undergraduates (implementing both parts correctly will result in extra credit for undergraduates).
Part 1: Image Quilting
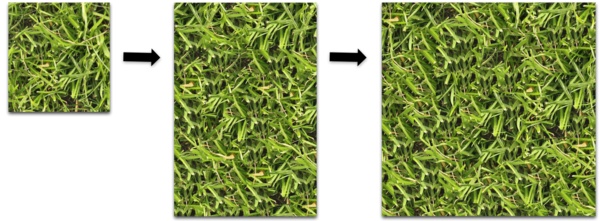
Image quilting is a simple technique for creating a larger textured image from a smaller input. The idea of the algorithm is to sample square regions or patches from the input in such a way that they align well, like a jigsaw puzzle.
The simplest algorithm (a) chooses source patches randomly, and arranges them in non-overlapping manner on the target image, which does not give a good "puzzle solution." A more complicated algorithm (b) overlaps the patches slightly, and chooses source patches so that each piece agrees with its neighbors. Finally, the full algorithm (c) allows puzzle pieces to have ragged edges in the overlap region, and solves for the best "seam" or "cut" using dynamic programming. The algorithms are shown in Figure 2 of the paper:
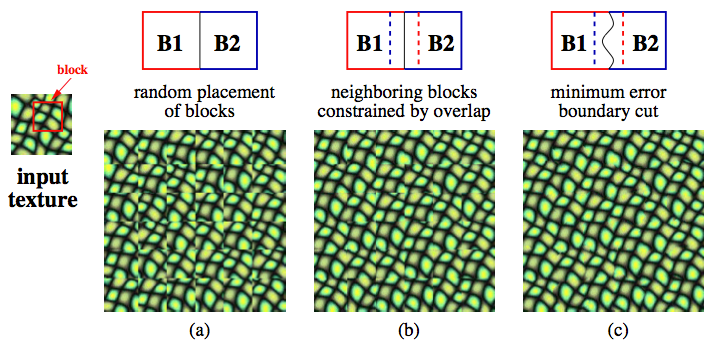
Your assignment is to implement the algorithm (c) in a language of your choice (suggested: MATLAB, Python). We recommend doing this by first implementing (a), then building on that for (b), and then (c). Read the paper and it should be fairly self-explanatory. However, we give some hints:
- When sampling patches from the source image, the source patch can have any pixel position whereas the target patch can only have positions that are multiples of its size.
- In (b), when finding a patch that agrees with its already-placed neighbor you can either exhaustively sample all possible source patches or else randomly sample a subset of them.
- In (b) if you always take the best patch according to the overlap error then this may produce repetitions. Instead, you can randomly sample one of the top k patches for more variation. Alternatively, you can select all patches with less than some error tolerance and randomly sample from those.
Part 2: PatchMatch (Mandatory for graduate students, optional for undergraduates)
PatchMatch is a method for quickly finding dense correspondences between "patches" or small square regions in a pair of images. I researched this for my Ph.D. thesis, and it was also tech transferred into some features of Photoshop such as Content Aware Fill. It was significantly (10-100x) faster than previous techniques so it allowed some high quality image editing applications to run interactively for the first time.
Your assignment is to implement the core matching algorithm for PatchMatch from Section 3-3.2 of the paper.
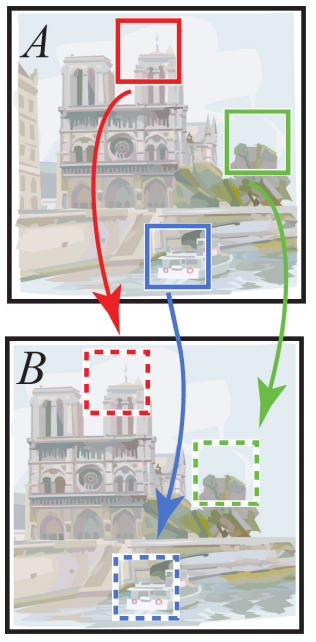
Unlike Image Quilting, PatchMatch finds correspondences between densely overlapping patches, meaning a patch is defined around every pixel. Patches have a small fixed size such as 7x7. The algorithm attempts to find for each patch in the "from" image A, what is the most similar patch in the "to" image B, under all possible (integer) translations:
The algorithm is a fast approximation algorithm, which may not find the best matching patch, but finds an approximate solution quickly. It does this by optimizing an array containing the correspondence mapping from image A to image B, in three phases:
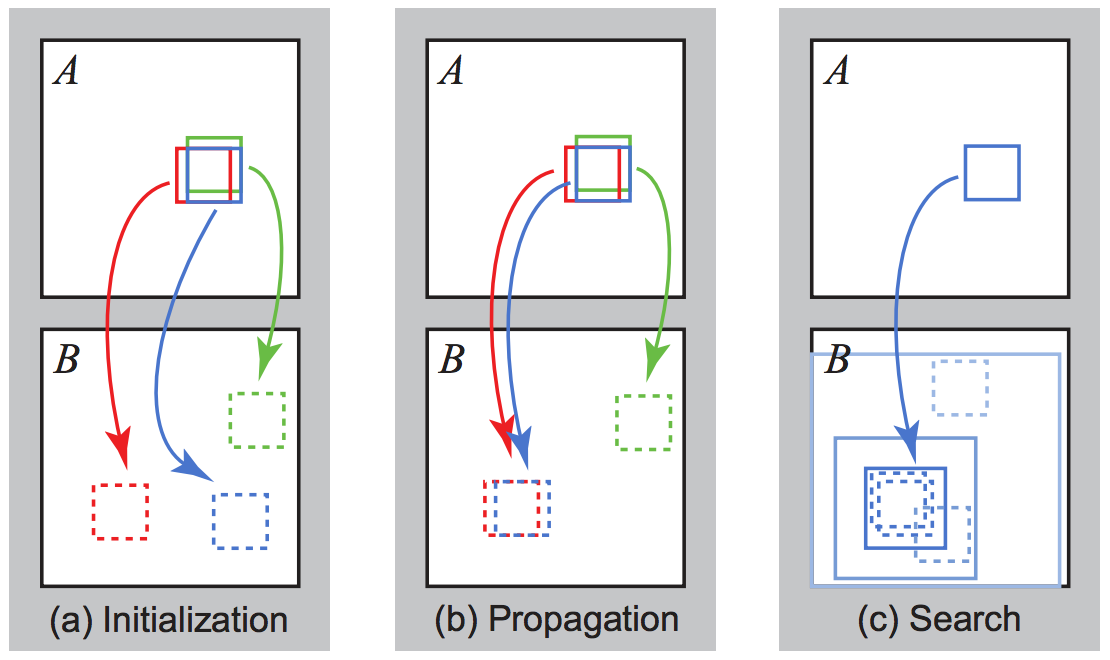
Your assignment is to implement the first two phases by referencing the paper. The third stage of random search is optional extra credit, although recommended because it gives better results.
Then, test your algorithm on the pair of images bike_a.png and bike_b.png. Find the match from the A image to the B image. Visualize the x and y coordinates of the correspondence field (plot them as images using imagesc in MATLAB or imshow in Python) and make sure these look reasonable. Also visualize the patch distance, which is also a 2D image. These should look roughly like x, y, D, although use your preferred color scheme. For extra credit, you can also reconstruct the A image using the matched patches of image B, as done in Figure 3, which gives this result.
Implementation notes:
- Every patch needs to be denoted with a coordinate. Two reasonable choices are to say a patch's coordinate is its upper left corner pixel, or its center pixel. If you choose upper left corner notation then there will be a gutter on the bottom and right sides of the image where pixels do not have a patch because the patch is partially outside the image. Make sure to skip patches that are outside the image by labelling them with high or "infinite" distance in all stages of the algorithm, to avoid invalid correspondences.
- The patch distance D can be an arbitrary function but one reasonable choice is to sum up the squared differences between corresponding pixels in the patch.
- See the efficiency notes at the end of Section 3.2. In particular, I recommend to store the correspondence field or "nearest neighbor field" f as a 3-channel array, containing in its first channel the x coordinate of the best patch found so far, in the second channel the y coordinate, and in the third channel, the patch distance D.
- For this application, just 2-5 iterations of the algorithm should suffice.
- I recommend to implement a method
improve_nnf which takes the nearest neighbor field f, a patch coordinate (ax, ay) and a proposed target patch coordinate (bx, by). This function exits early if the target patch coordinate is out of bounds. Then it modifies the NNF if the target patch coordinate has less patch distance (SSD) than the one currently stored in the NNF. With this method is it then straightforward to implement propagation.
- The paper stores in the nearest neighbor field f the relative offset vector f(ax,ay) = (bx-ax, by-ay). You can alteratively use absolute coordinates, with the notation, f(ax,ay) = (bx, by). Bounds checking is easier with absolute coordinates. However, propagation with relative coordinates just involves trying the same offset vector as your adjacent patches, which for absolute coordinates requires an additional shift by +1 pixel (best to draw on paper if you are confused).
Policies
Feel free to collaborate on solving the problem but write your code individually.
Submission
Submit your assignment in a zip file named yourname_project1.zip. In the root directory place a README.txt file that is your writeup, which should include:
- Your name
- UVA computing ID
- Operating system
- Note any unfinished parts of the assignment, and any extra credit you did
For Part 1, place a subdirectory part1 in your zip file containing:
- Source for a program that allows the full algorithm (c) to be run.
- Add to your README writeup a brief text documentation of how to run the program.
- Choose a new and fairly repetitive texture image from your own photos or Flickr. Save the input and output to images starting with
input and output in the part1 subdirectory (we will collect any neat outputs for a gallery of results). The output should be at least twice the width and height of the input to test the algorithm.
For Part 2, place a subdirectory part2 in your zip containing:
- Source for your PatchMatch implementation.
- Add to your README writeup a brief description of how to run the program.
- Include your visualizations of the x and y correspondence values found by the algorithm, as well as the patch distance D, after the algorthm has converged. Submit these in the files,
vis_x.png, vis_y.png, vis_d.png. If you did the extra credit of showing the reconstruction of A from B patches, then also submit vis_reconstruction.png.
Finally submit your zip to UVA Collab.