Project 2: VR

CS 6501 -- 3D Reconstruction and Understanding

Due: Tues, Nov 7 (11:59 PM)

This project will let you explore a highly simplistic pathway for transporting stereo imagery to VR. Specifically, we will download stereo images, and then place them in a virtual reality setting, where they can be moved around. Depending on your choice of content, the VR experience could look like this:


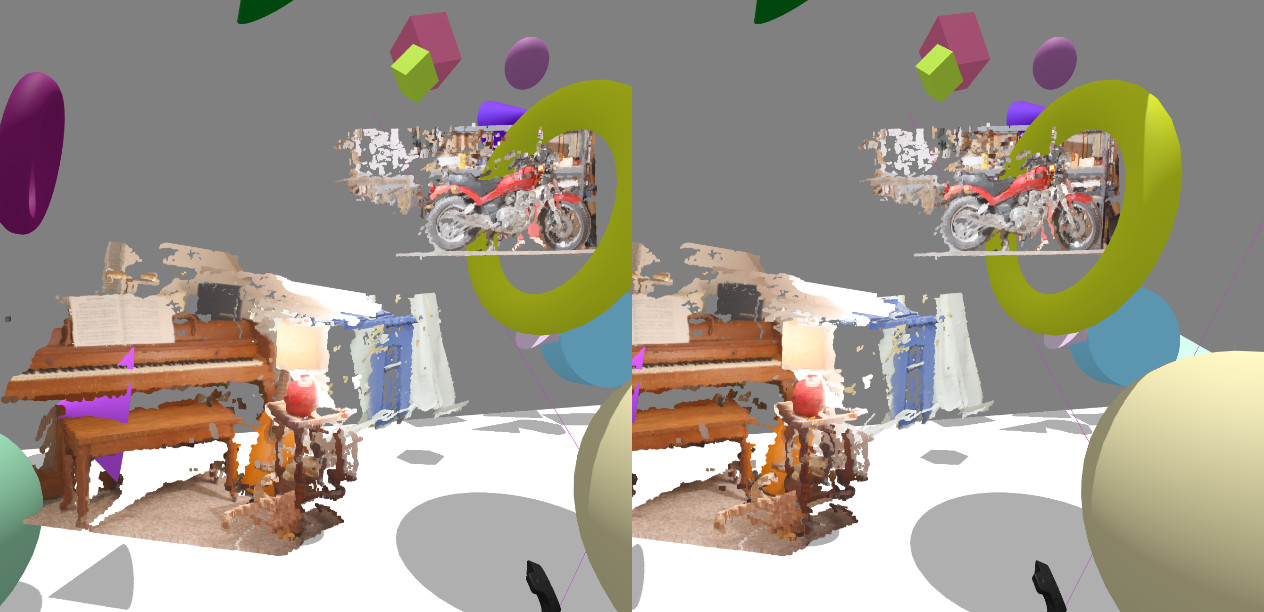
A motorcycle driving through a torus, next to a piano, a recycle bin, spheres, cubes, and tori. Imagery from Middlebury dataset.

For the project, we assume you have rectified stereo photo pairs as an input. You can find existing rectified stereo photos from the Middlebury dataset.

We also assume you have a VR display device. There are some such devices (Rift and Vive) in the locked VR cabinet in Rice 340, as well as VR-ready computers with high-performance GPUs to connect them to.

Hardware rules: For the keycode to obtain the key from the lock-box, see the Collab notification for Project 2 (please cycle the lock combination to random after opening and closing the lock-box). The lock-box itself is attached to the foot of the right end of table that is next to the VR cabinet. For all hardware (VR display and VR-ready computers with GPUs), you agree to follow the following rules under the University Honor Code: (1) do not remove the hardware from the Rice 340 lab, (2) return the hardware to the cabinet when you are finished, (3) lock the cabinet when you are finished, and (4) return the key to the lock-box.

Rice 340 availability: The Rice 340 room can be used by our course at (please be quiet and share equipment if there is a shared class):

DayTime
Sunday9:00 to 22:00 (shared with CS 4720 and CS 4730 from 13:00 to 21:00)
Monday19:00 to 23:00 (not formally reserved but have permission from Mark Sheriff to join CS 4720/4730's session from 19:00 to 22:30)
Tuesday16:00 to 23:00 (during 19:00 to 20:00, not formally reserved but have permission from Mark Sheriff to join CS CS 4730's session)
Wednesday13:30 to 15:30, 19:00 to 22:00
Thursday19:30 to 22:00
Friday18:00 to 22:00
Saturday9:00 to 22:00

TA Xinge Wen is in the Rice 340 lab at the following times, to help you set up VR equipment:

Thursday Nov 2, 20:00PM ~ 21:00PM
Saturday Nov 4, 14:00PM~15:00PM
Sunday Nov 5, 14:00PM~15:00PM

We will use stereo reconstruction using Python and OpenCV, and virtual reality display using Oculus Rift or HTC Vive. The display will happen through the JavaScript library three.js, which displays 3D graphics, in a WebVR compatible browser such as Firefox.

Policies

For this project, feel free to collaborate on solving the problem but please write your code individually. In particular, please do not copy code from other students.

Part I: Stereo Reconstruction

  1. To get started, download a few stereo pairs from the Middlebury dataset. You can later capture your own pairs using the stereo camera if you like.

  2. (25 points) Make a stereo matching utility that takes as input a rectified stereo pair and outputs a 3D point cloud in .ply format. The .ply format is a generic format for 3D meshes. The stereo matching for us is actually quite straightforward, because there is already demo code available for this task in OpenCV. You can view the produced .ply files in a viewer such as MeshLab. Make the following modifications to the demo stereo matching code: (1) The default settings produce excessive numbers of outlier points. Experiment with the settings for the uniquenessRatio and blockSize parameters until more outliers are rejected and the produced meshes seem more reasonable; (2) Call cv2.pyrDown() twice on each input image to avoid excessive mesh resolution (which slows down the VR experience later). (3) In the write_ply() function, the colors array encodes the RGB colors of the produced points. However, due to an apparent bug in one of the converters or loaders later on, the red and blue channels end up being swapped when the model is displayed in the viewer. A proper fix would be to locate and fix this bug, but an easy hack to fix this is to simply swap the RGB color order to BGR in the colors array before saving (either fix is acceptable for this project).

  3. (5 points) Produce .ply files for 3 pre-captured stereo image pairs from the Middlebury dataset (or another source of rectified stereo images online). Make sure the .ply files look reasonable in MeshLab. Using the inverted color order, one of the instructor's meshes looked like this:


  4. (5 points) The JavaScript library three.js cannot display these .ply files as-is, because they only contain 3D vertices, and its .ply loader renders only the 3D faces. A fix for this is to convert the .ply files to .pcd format, which three.js can load and display as a point cloud. You can do this by using the tool pcl_ply2pcd from the Point Cloud Library (for Mac, see also Homebrew install instructions). Make this conversion to .pcd.

Part II: Virtual Reality Experience

  1. (10 points) Clone the JavaScript library three.js, which displays 3D graphics, into your project. The Firefox browser supports WebVR, so download and use it for the remainder of the project. Verify that the example .pcd loader three.js/examples/webgl_loader_pcd.html shows a point cloud in Firefox. Modify the example to instead load one of your exported .pcd files.

  2. If you have the VR headset set up, then for fun, you can check out some of the VR demos in the three.js library. See the files named three.js/examples/webvr*.html.

  3. (35 points) Modify the following VR headset code to load your three PCD files that you exported in Part I: three.js/examples/webvr_vive_dragging.html. You can do the coding for this step on any machine of your choice and without a VR headset: in the next bullet you can deploy it to the VR hardware. A few points your program should take care of: (1) The loader's .load method calls an anonymous function on a mesh. In that function I suggest to use THREE.GeometryUtils.center( mesh.geometry ) to center the mesh's geometry (to prevent it from being far off-camera). (2) In the loader, I suggest to use a small scale factor (see the file webvr_vive_dragging.html for how to set scale factor). (3) Decrease the number of spheres, tori, and cubes in the scene so you will be able to grab your point clouds more easily using the controller. (4) The object intersection is not very efficient since it simply loops through all primitives (e.g. points, triangles, etc) in the scene rather than using a bounding volume hierarchy such as an octree to accelerate ray-object intersections. If the point clouds do not contain too many points (e.g. the .pcd files are less than the 4 MB suggested before), then a simple workaround is to simply perform intersection calls when there are spare CPU cycles rather than on each rendered frame. This can be done by simplying move the IntersectObject calls from render() to animate().

    Hint: For debugging information, in Firefox, click the upper right menu button, then Developer, then Browser Console.

  4. (20 points) Go to the Rice 340 lab, and use one of the VR headsets and controllers to see if you can drag and drop your loaded objects around in VR. A few hints: (0) Rift is easier to set up than Vive. (1) Follow the headset's setup instructions, and get one of the Vive or Rift's apps working first before trying WebVR in Firefox. Make sure the controllers and headset report a "success" status. (2) In some cases, the VR display may not show the Firefox content even after clicking "enter VR." You may have to quit and reopen Firefox to fix this. If this still does not fix the issue, you may have to enter sleep mode and then exit sleep mode. (3) Try some of the existing three.js WebVR demos (three.js/examples/webvr*.html) before trying your code. (4) There is a bug in the three.js ray intersector, so that the point cloud objects are "bigger" than they should be for intersection purposes. One solution is to simply put the controller as close as possible to the object you want to move before clicking the trigger to move it.

    Take a couple screenshots of your VR scene as you move the objects around, and a selfie of yourself looking stylish with the VR hardware and your cool scene.

Submission

Submit your assignment in a zip file named yourname_project2.zip. Please include your source code for both of part 1 and part2, as stereo_match.py, the .ply and .pcd files you reconstructed, your final VR viewer HTML code (based on modifying webvr_vive_dragging.html), and your 2+ screenshots and selfie. Please only submit these files: please do not zip up the entire 1 GB three.js repository.

Finally submit your zip to UVA Collab.